I recently posted a picture of this wallet card and have been asked by a few people for instructions.


I've 'cobbled' some together so please excuse the appearance to this tutorial.
Please note: whilst some of the products I used are now retired,you could easily substitute
Supplies:
Melon Mambo cardstock 6” x 6 3/4”
Whisper White cardstock
Pop of Pink washi tape
Glitter washi tape retired
Gold cord trim retired
White satin ribbon
Thick thread
Punch retired
Stamp set(s) of your choice I used Best Decision Ever & Workshop Words (retired),both sets US/Can only)
Whisper White Envelope
Instructions:
On the Melon Mambo card measure and mark 3” along the 6” side
On the 6 3/4” side measure and mark 2 7/8” - see photo below

From the 3” mark, measure down and mark 1 5/8” as in the photo below
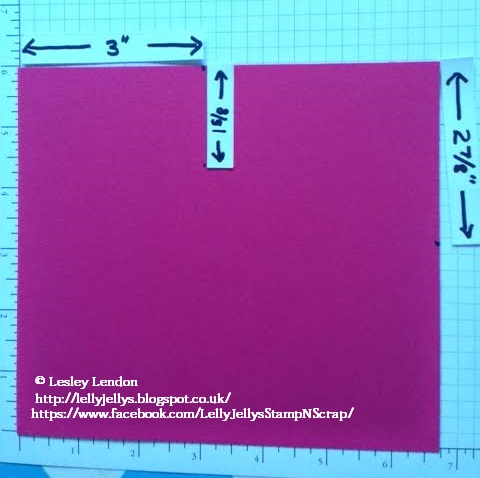
Join up the 3 pen marks, cut along the lines and remove the excess card, as shown top right in the picture below.
Measure 1” up from the bottom right hand corner and 1” along the bottom edge towards
the left as shown by the pen marks in the picture.

Join the two marks and remove the corner piece.

Using a corner rounder punch, round the top left hand corners

Score along the lines shown here in white, to create your tabs

Now remove a strip ½” deep as shown in the picture below

Fold along the score lines, put glue on the tabs and fold over and stick to create your wallet.

Decorate your wallet as you’d like it – I used toning washi tape.
Cut a piece of whisper white card 2 ¾” x 5 ¼”, which will slide into the pocket. Stamp/decorate as wished. I added washi tape and thick twine.

I do hope that these instructions are easy for you to understand. I'd love to see what you make, please share with me!
Lesley x

This site is my sole responsibility as an Independent Demonstrator and is not endorsed by Stampin' Up! Images copyright 1990 - present day Stampin' Up!


5 comments
Thanks so much for the tutorial. Its perfect!I will be making these for my top 2 in sales for July.
ReplyDeleteYou are very welcome Cindee! I do hope your downline enjoy receiving them. x
ReplyDeleteThank you for sharing!
ReplyDeleteYou're welcome! I hope you get to make one too!
DeleteFabulous, I live this downline gift, a great easy to follow tutorial too thank you for sharing, xxxx
ReplyDelete