I made these card this past week not sure
These were my swaps for Onstage Live. I didn't make many as I'd opted to take part in a WOW! swap too.
The sky was created in the same way that I did on my recent bendy card.
I've been asked by a few people how I did the sky so, when I was making these, I took a few photos along the way. If only I was good at videoing but it was I don't have a stand and it was hard trying to demonstrate and hold the camera in the other hand. I just about dropped the camera and inked the table instead!
So, as a reminder, here is the bendy card....

First, I should mention that I like to work on a craft sheet. They have quite a high shine with their silicone type coating and make it easy to work the ink.
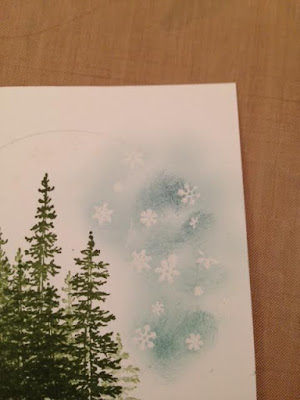
I took a piece of whisper white card, stamped the tree images then used the resist emboss technique with the snowflakes - I stamped the snowflakes in versamark, used clear embossing powder then heated them. You might just be able to spot the snowflakes in the picture below. The pencil mark ws just a guideline for me.
Place the card onto the craft mat. Ink up your dauber or sponge with the lightest colour, in this case, Lost Lagoon. I usually tap the dauber onto the mat first in case there is too much ink, it doesn't get wasted as you use it later. Working in gentle circular motion, apply the ink to the edge of the card, you begin off the edge of the card on the mat and gradually work the ink onto the card. When your dauber or sponge runs out of ink you just use the bit that is on the craft mat as it will stay wet enough to use.
Although the picture below doesn't show ink near the edge of the card, you will get a similar effect. The snowflakes will start to become noticeable. Don't go right up the the trees, leave a small area without ink.
Continue until you have the ink where you want it. Now change to another dauber or sponge and apply the medium shade of in in the same manner. I used Island Indigo. Don't completely cover the first colour, leaving an area around the trees in just the lightest shade so that the further away from the trees you are working the darker the ink is. Ensure there are no hard lines by gently blending the two colours.
You'll get an effect similar to this...
Looks a little 'cloudy', doesn't it. Now it's time to add the third layer of ink, the deepest or darkest colour. I used Night of Navy. Apply in the same manner, leaving the area nearer the trees lighter than the rest. By the time you put this layer of ink on it feels very smooth to work with. You'll get an effect similar to this...
There were a few little hard patches of colour so I blended them in with the lightest ink - lost lagoon - to smooth all the lines out. I then took a piece of kitchen towel and gently rubbed over the sky, this removed any excess ink for the snowflakes.
Finally I completed the card.
I hope you found my instructions to be clear - do leave a comment Then go try it yourself and give me feedback on how you got on.
Happy crafting!


5 comments
thanks for your great instructions! I will it try!
ReplyDeleteRegina from Germany
Hi Regina! For some reason I wasn't notified that you'd left a comment, I'm sorry for the late reply :( Thank you for taking time to stop by and comment. Do let me know how you get on with your cards.
DeleteLovely wintery cards Lesley.
ReplyDeleteLovely wintery cards Lesley.
ReplyDeleteHi Laura, thank you for your kind comment.x
Delete